


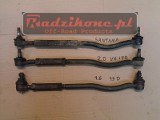
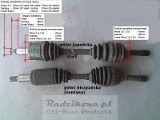
Porównanie przedniej półosi japońskiej i hiszpańskiej
Vitary 1.6 oraz 1.9D/2.0HDi produkowane po 1995r. to w większości wersje hiszpańskie (Santana), w których podnosząc zawieszenie należy wymienić półosie z hiszpańskich na japońskie
(hiszpańskie półosie są bardzo słabe i nie wytrzymują żadnego lift'u zawieszenia).
Wersję Vitary najprościej poznać po numerze VIN, jeśli zaczyna się od litery V oznacza produkcję hiszpańską, jeśli od J - japońską. Upewnić się jednak trzeba sprawdzając dokładnie półosie
(poprzedni właściciel "hiszpanki" mógł wymienić półosie na japońskie).
Lewa półoś jest przykręcana do mostu na 3 śruby --> podpasuje każda japońska
z Vitara 1.6 (1988-1995).
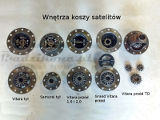
Prawej półosi japońskiej i hiszpańskiej, są dwa rodzaje: na 22 lub 26 frezów od strony mostu.
Żeby kupić odpowiednią japońską, należy wyjąc starą półoś hiszpańską z mostu i policzyć frezy.
Japońskie półosie prawe na 22 frezy (od strony mostu) są łatwo dostępne, bo występują we wszystkich Vitarach 1.6 z roczników 1988-1995.
Prawa półoś japońska na 26 zębów od strony mostu jest bardzo rzadko spotykana. Występowała wyłącznie w niektórych Vitarach 1.6 16v (1996-1997) oraz w niektórych Vitarach X90 1.6 16v.
Poniżej zdjęcie porównawcze.

Jak uzyskać prawą półoś japońską na 26 zębów do Suzuki Vitara I 1.6
Sposób pierwszy:
Potrzebujesz:
- prawą oryginalną używaną półoś japońską z Vitara 1.6 na 22 zęby (oba przeguby o średnicy zewnętrznej 76mm)
- prawą oryginalną używaną półoś japońską z Vitara 2.0 (lub GV I 1.6 / 2.0 z przedłużką przegubu), oba przeguby o średnicy zewnętrznej 76mm
Z półosi od Vitara 1.6 zdejmujesz obudowę przegubu wewnętrznego (na 22 zęby), rozbierasz
i zostawiasz tylko część, która wchodzi na ośkę (bez kulek i koszyka).
Następnie z przegubu od Vitara 2.0 montujesz: obudowę przegubu wewnętrznego na 26 zębów
wraz z kulkami i koszykiem.
Uwaga! "Operacji" nie da się wykonać na nowych zamiennikach.

Sposób drugi:
Potrzebujesz:
- prawy przegub wewnętrzny z Santana na 26 zębów
- kompletną prawą półoś japońską z Vitara 1.6 na 22 zęby od strony mostu (oba przeguby
o średnicy zewnętrznej 76mm)
Z przegubu wewnętrznego półosi hiszpańskiej odcinamy kawałek przegubu wraz z wieloklinem
na 26 zębów.
Z przegubu wewnętrznego półosi japońskiej odcinamy obudowę przegubu.


Następnie obudowę japońską i wieloklin na 26 zębów dokładnie spawamy.

Wnętrze bierzemy z przegubu japońskiego i składamy całość na półosi japońskiej.
Radzikone Guides
 |
Front steel differential Suzuki Vitara I / Grand Vitara I |
 |
Differential cases Vitara / Grand Vitara I / Samurai |
 |
Axle ratios Suzuki Vitara I / Grand Vitara I |
 |
Wheel alignment setting Suzuki Vitara I / Grand Vitara I |
 |
Tie rods ends and tie rods Suzuki Vitara I |
 |
Tie rods Suzuki Grand Vitara I |
 |
Suzuki Vitara I mods Suzuki Vitara I |
 |
Front driveshafts Suzuki Vitara I |
 |
Quick front spring replacement with Radzikone A-arms |
 |
3x Grand Vitara - 3d, 5d, XL7 - which one to choose? What engine? What tires? |
 |
How and how much cut the arches to fit too big tires? |
 |
Zabudowa wyprawowa za 20zł |
 |
Zwrotnice przednie Grand Vitara I |
Other
 |
Dawid z firmy Deler wybiera i montuje Lift do Grand Vitary I |
 |
"Terenwizja" guide Suzuki Vitara I |
 |
Front locking hub rebuild |
 |
How to check wheel offset |
Installation instructions
 |
3" and 4" Radzikone lift kit assembling Suzuki Vitara I |
 |
Setting the wheel alignment with Radzikone suspension lift kit Suzuki Vitara I / Grand Vitara I |